

Description
Hansen 63mm (2 1/2”) Check Valve, BSPT / HCV63
Hansen check valves are used in-line as a non-return valve to stop fluids from flowing back through your system. BSPT.
The unique design gives you exceptional flow rates, which means you can move more water in less time saving on pumping costs. The screw cap allows for easy access for in-line servicing, there is no poppet valve to wear or jam and the diaphragm and spring are interchangeable and replaceable with the same size Foot Valve.
SPECIFICATIONS
- PRODUCT CODE: HCV63
- CODE MEANING: HANSEN CHECK VALVE
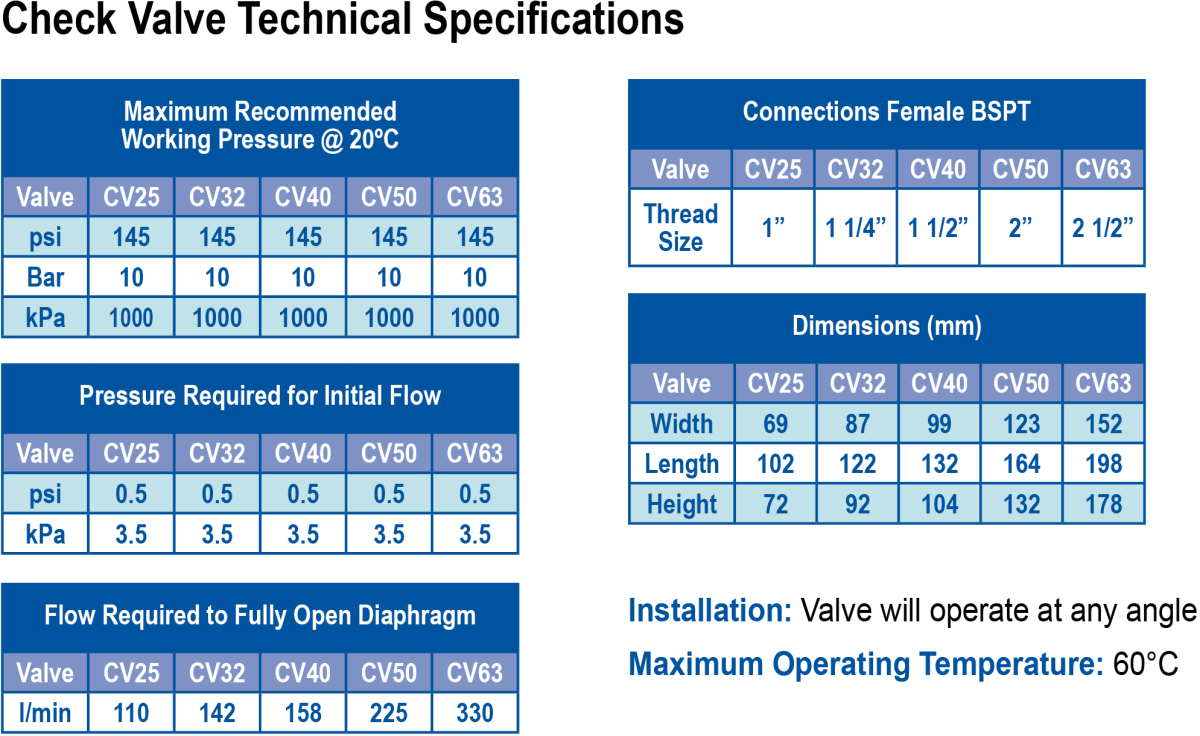
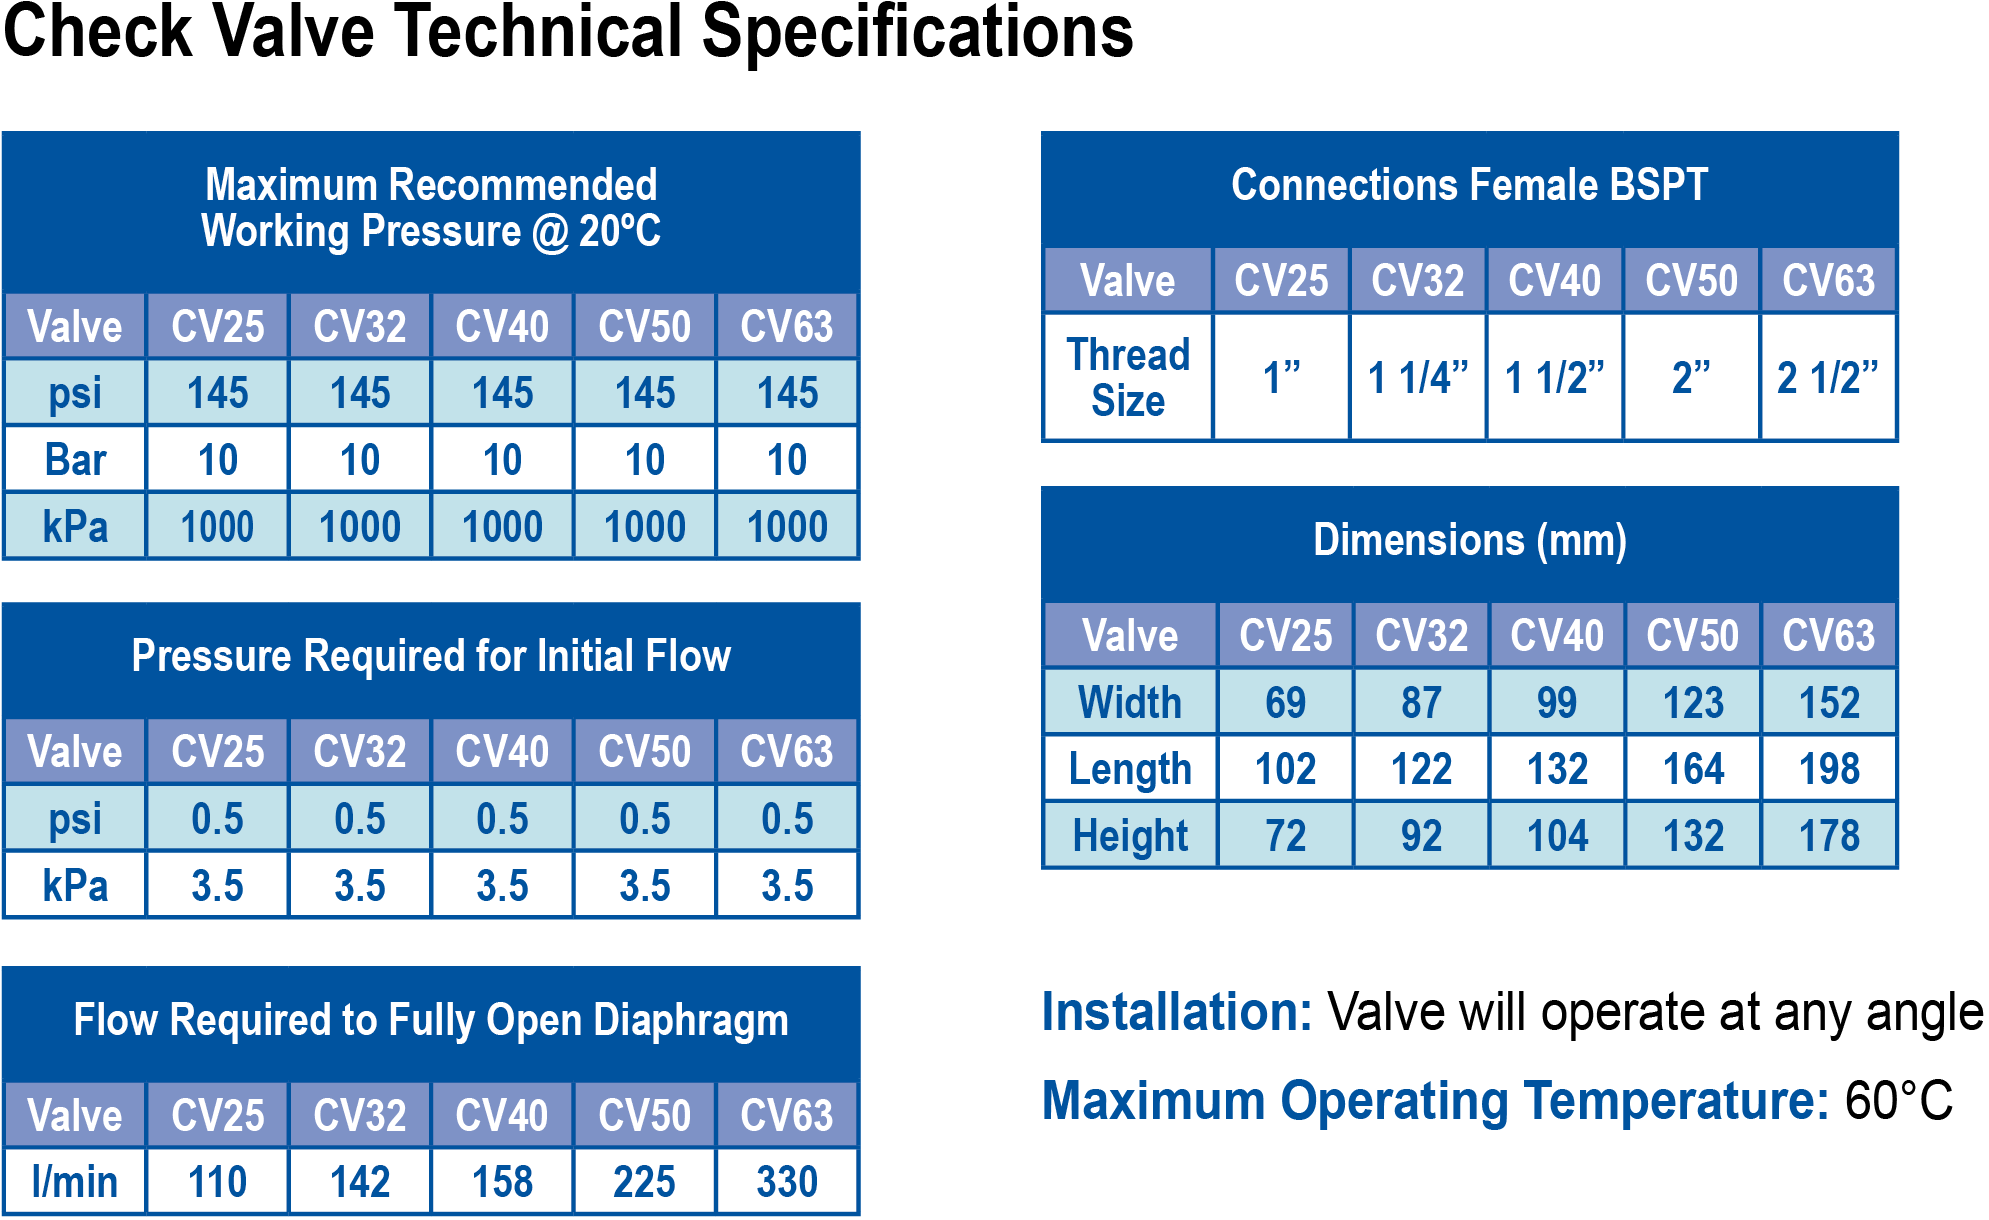
- MAXIMUM RECOMMENDED WORKING PRESSURE @ 20º DEGREE CELCIUS/68º FAHRENHEIT: 145 psi, 10 Bar, 1000 kPa
VALVE CV25 CV32 CV40 CV50 CV63 psi 145 145 145 145 145 Bar 10 10 10 10 10 kPa 1000 1000 1000 1000 1000 - PRESSURE REQUIRED FOR INITIAL FLOW: 0.5 psi, 3.5 kPa
VALVE CV25 CV32 CV40 CV50 CV63 psi 0.5 0.5 0.5 0.5 0.5 kPa 3.5 3.5 3.5 3.5 3.5 - FLOW REQUIRED TO FULLY OPEN DIAPHRAGM: 330 l/min
VALVE CV25 CV32 CV40 CV50 CV63 l/min 110 142 158 225 330 - CONNECTIONS FEMALE BSPT (THREAD SIZE): 2 1/2″ (63.5mm)
VALVE CV25 CV32 CV40 CV50 CV63 THREAD SIZE 1″ 1 1/4″ 1 1/2″ 2″ 2 1/2″
- INSTALLATION: Valve will operate at any angle.
- MAXIMUM OPERATING TEMPERATURE: 60ºC / 140ºF
- CHECK VALVE FLOW CHART (Please see image gallery for visual chart and guide of choosing the correct check valve)
- Please see the [CHECK VALVE FLOW CHART] in the image gallery to follow the instructions and determine the correct Check Valve for your requirements.
- Because of the unrestricted Full Flow design of the Hansen Check Valve you will often find you will be able to choose a smaller Hansen Check Valve than most other check valves on the market.
- As the Flow Chart is based on head loss across a fully opened diaphragm, firstly, go to the table following headed “Flow Required to Fully Open Diaphragm” and check which valves sizes will not be fully open with your system flow.
- To Read the Check Valve Flow Chart, find your system flow across the bottom of the chart on this page and take a line vertically up the chart to size a valve with an acceptable head loss for your system.
- EXAMPLE: with a flow of 300lpm a CV50 will have a head loss of 1.1m and a CV32 will have a head loss of 4.4m. 300lpm will not fully open a CV63.
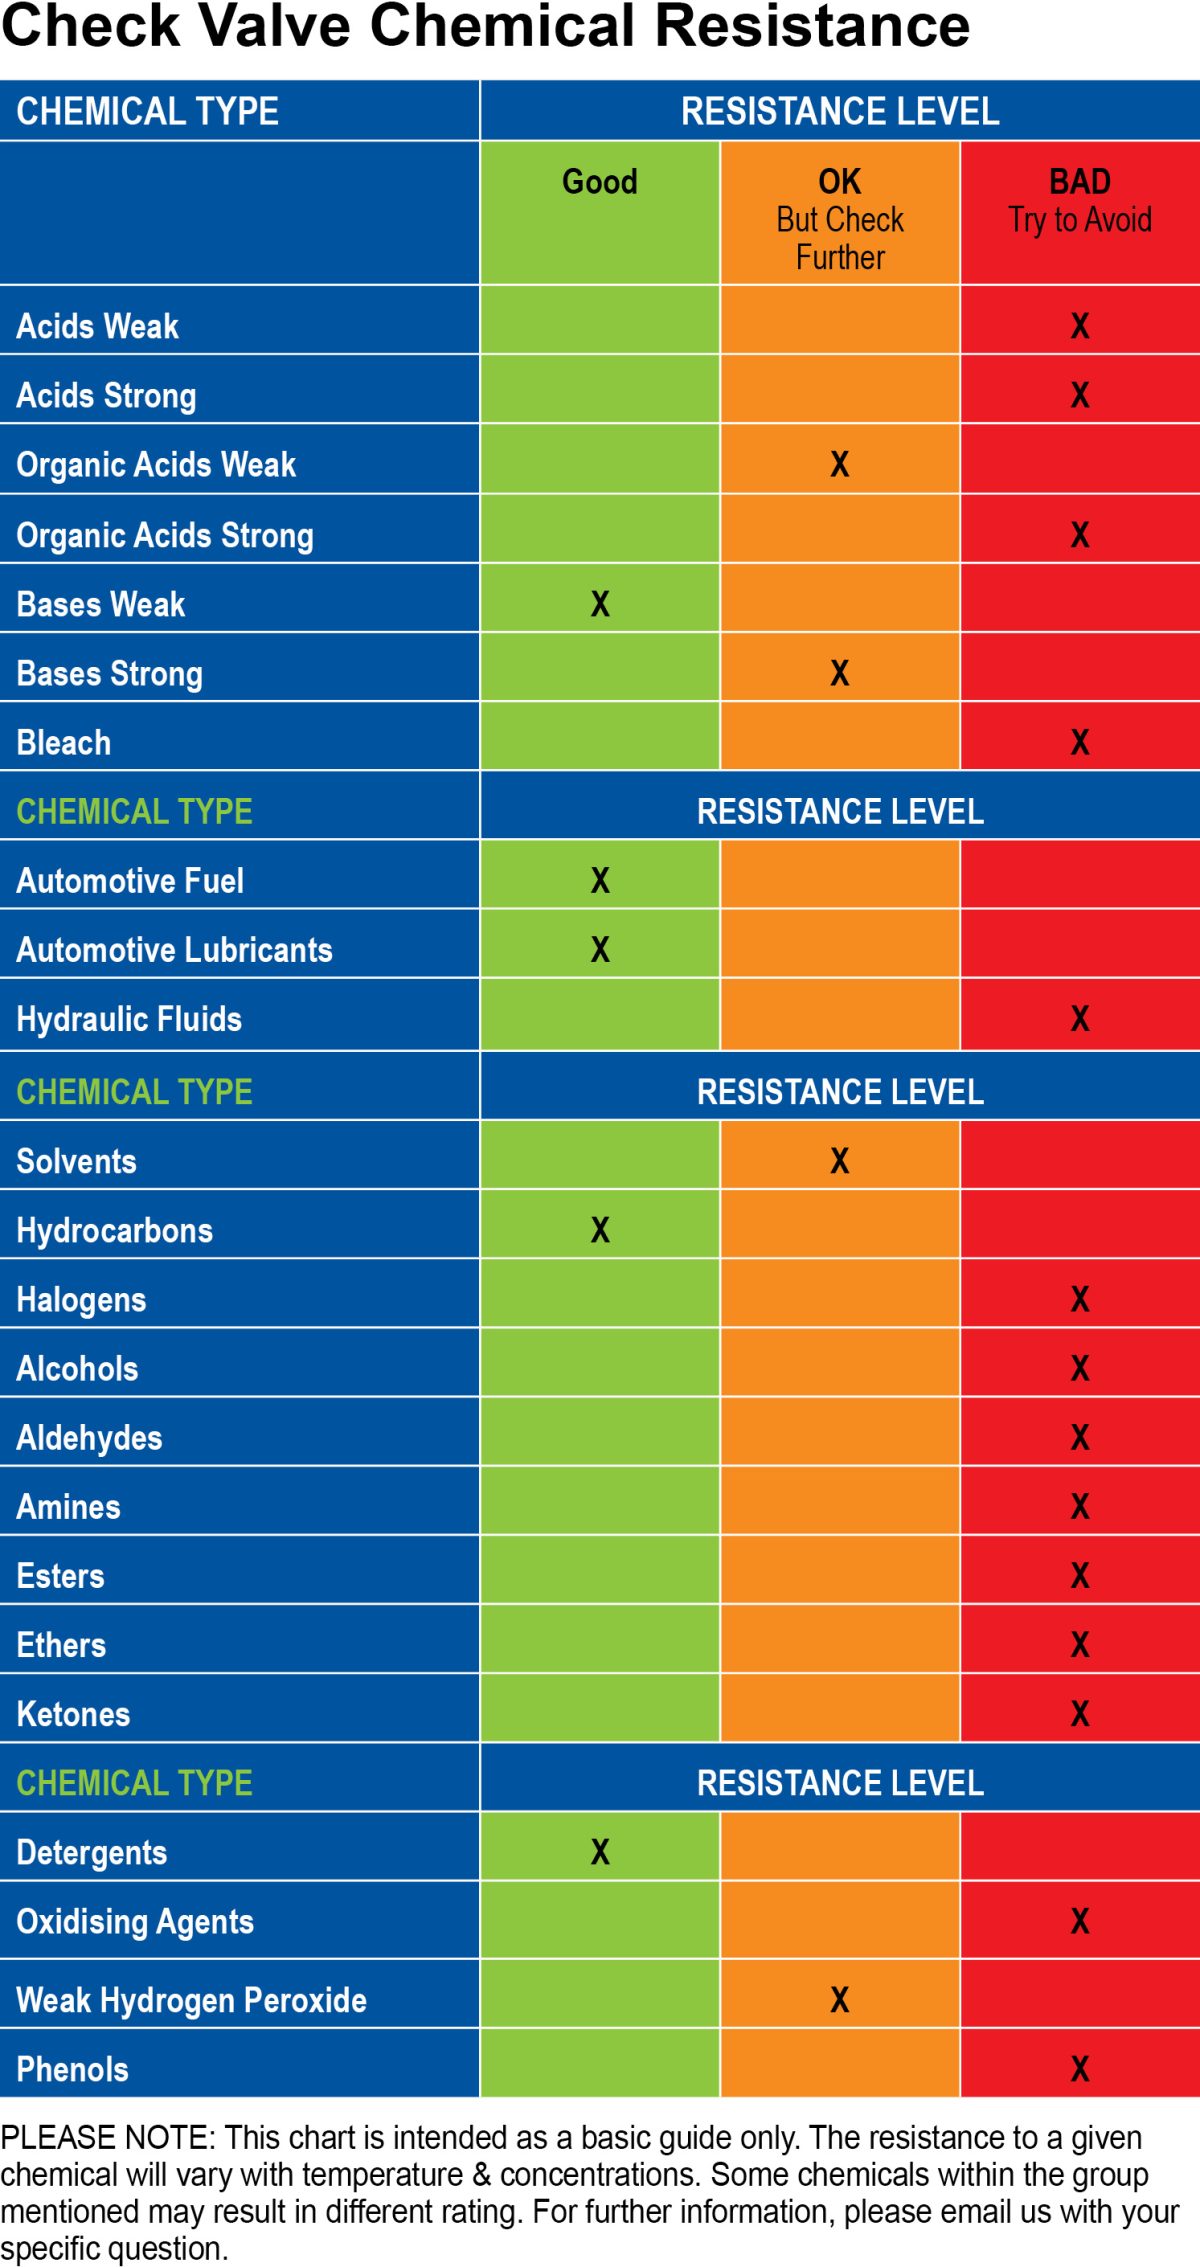
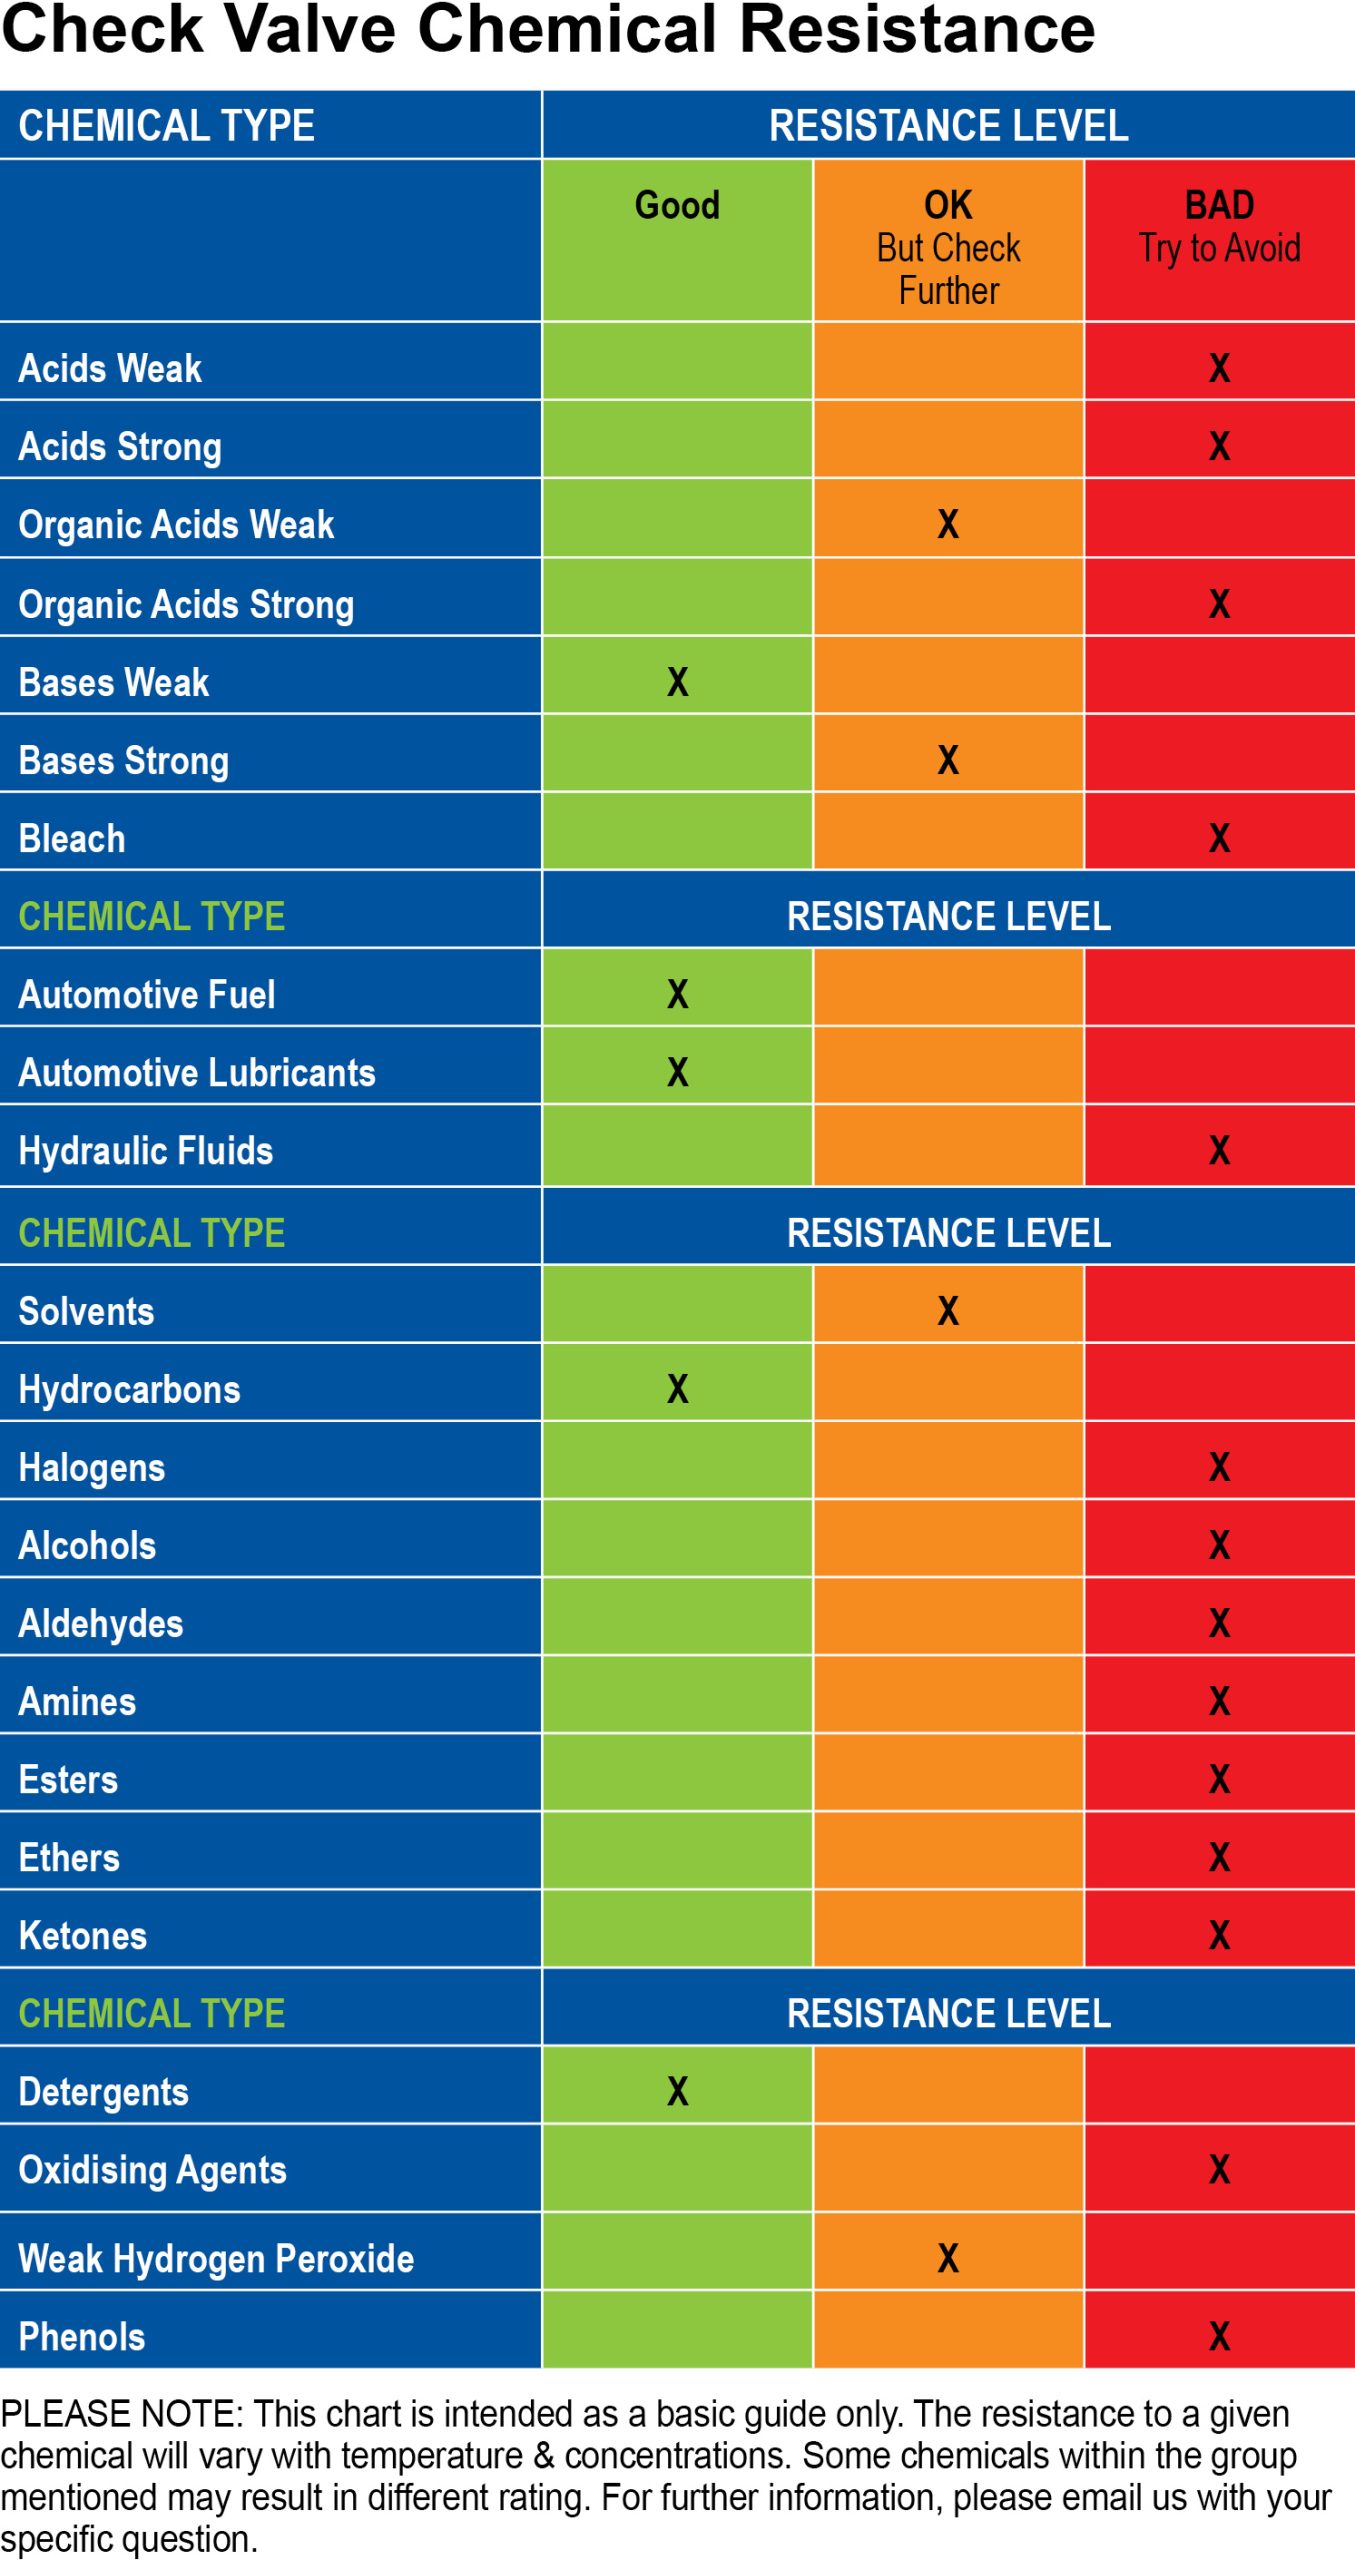
- CHEMICAL RESISTANCE CHART OF CHECK VALVE
- Please refer to the attached images for full chart of chemical resistance.
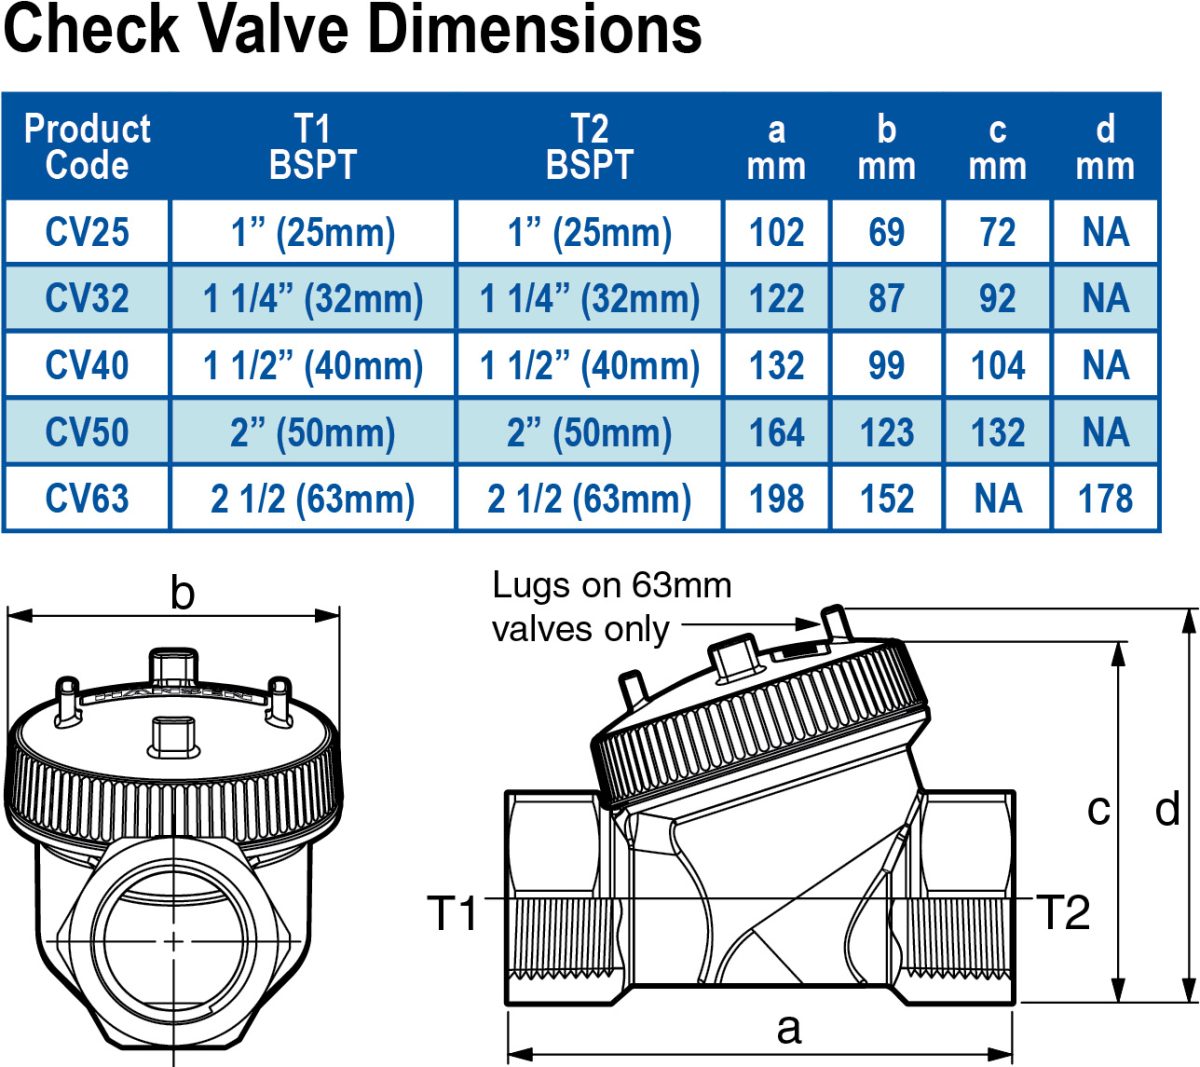
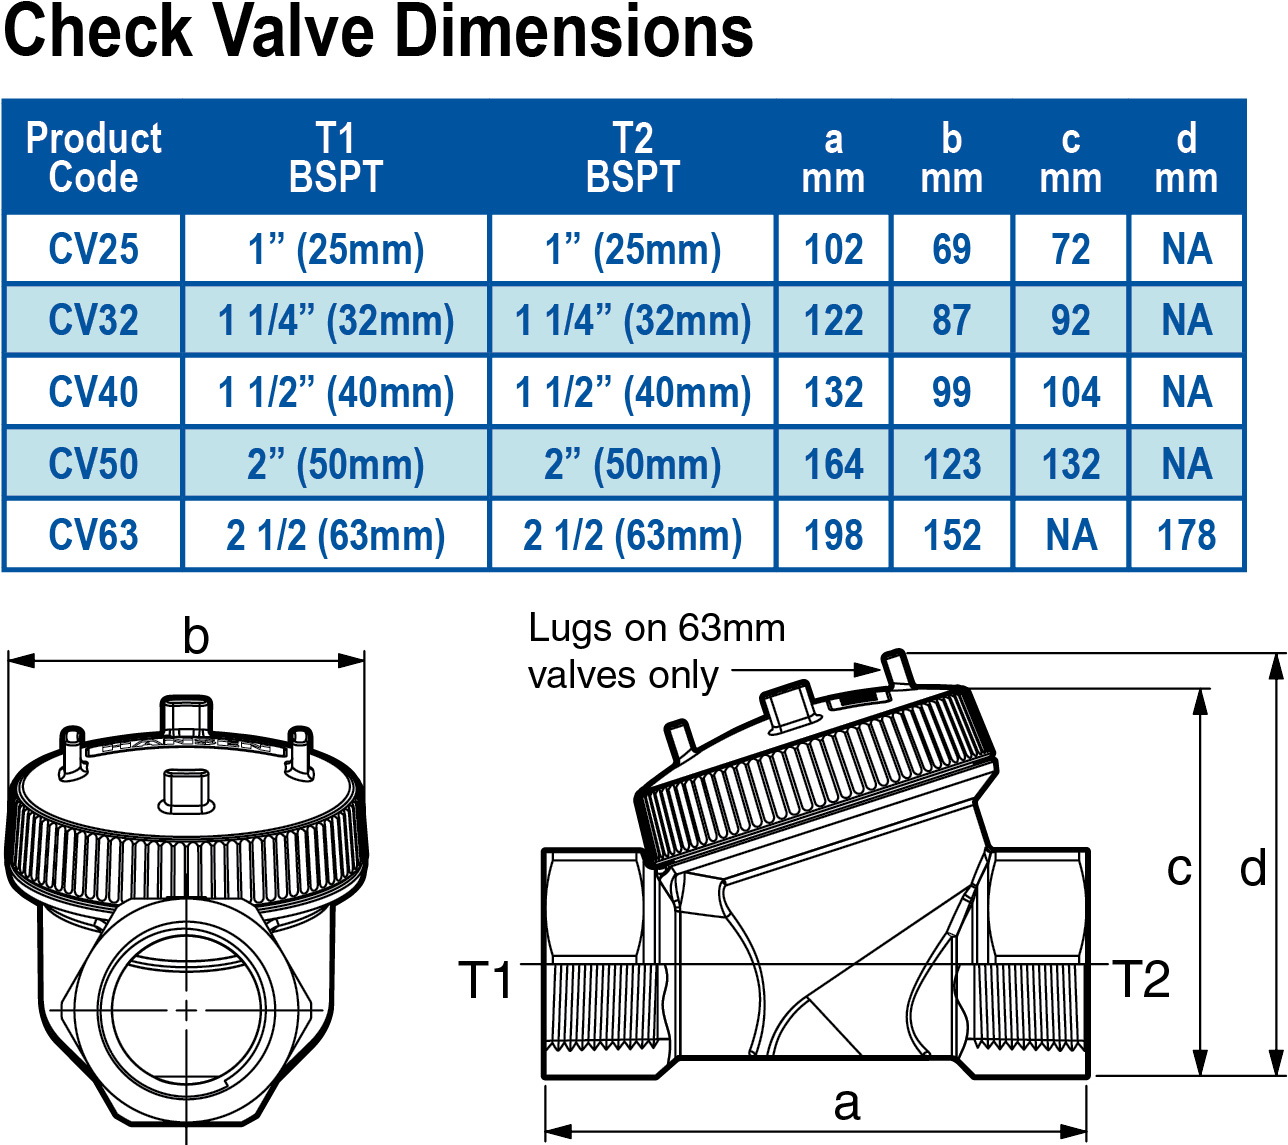
- DIMENSIONS (Please see image gallery for sizing chart and guide)
PRODUCT CODE T1 BSPT T2 BSPT SIZE A SIZE B SIZE C SIZE D CV25 1″ (25mm) 1″ (25mm) 4″ (102mm) 2.7″ (69mm) 2.8″ (72mm) N/A CV32 1 1/4″ (32mm) 1 1/4″ (32mm) 4.8″ (122mm) 3.4″ (87mm) 3.6″ (92mm) N/A CV40 1 1/2″ (40mm) 1 1/2″ (40mm) 5.2″ (132mm) 3.9″ (99mm) 4.1″ (104mm) N/A CV50 2″ (50mm) 2″ (50mm) 6.5″ (164mm) 4.8″ (123mm) 5.2″ (132mm) N/A CV63 2 1/2″ (63mm) 2 1/2″ (63mm) 7.8″ (198mm) 6″ (152mm) NA 7″ (178mm) - PRODUCT CODE: CV63
- T1 BSPT: 63mm (2 1/2”)
- T2 BSPT: 63mm (2 1/2”)
- SIZE A: 198mm (7.80″)
- SIZE B: 152mm (5.98″)
- SIZE C: N/A
- SIZE D: 178mm (7.01″)
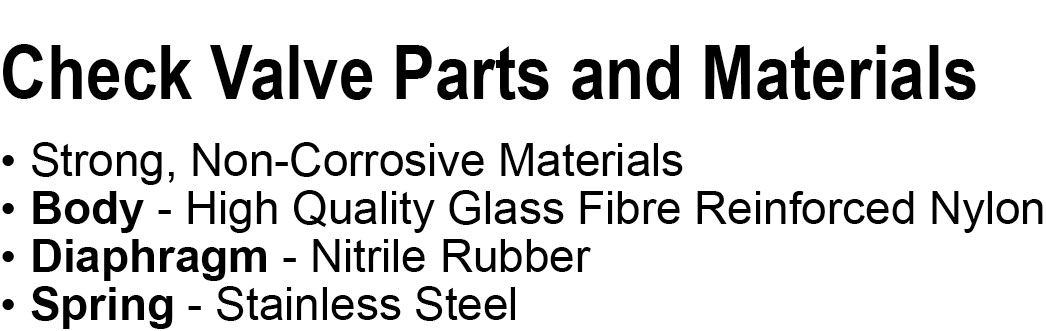
- CHECK VALVE PARTS AND MATERIALS
- Strong, Non-corrosive materials
- BODY: High Quality Glass Fibre Reinforced, Nylon
- DIAPHRAGM: Nitrile Rubber
- SPRING: Stainless Steel
- Check Valve is AS/NZS 4020:2018 approved, see certificate at Hansen Australia Website. The check valves have met the requirements of AS/NZS 4020 Australia & New Zealand drinking water test standard.
- For spare or replacement 25mm FV & CV Diaphragm & Spring, see HVD25.
FEATURES AND BENEFITS
- High performance, cost effective check valve with a strong, compact design that delivers high volumes of water quickly with unrestricted full flow.
- Unique design gives you exceptional flow rates thus, can move more water in less time and save on pumping costs.
- Screw cap allows for easy access for in-line servicing.
- No poppet valve to wear or jam.
- Diaphragm and spring are interchangeable with the same size Hansen Foot Valve.
- Fast response when opening and closing.
- Smooth operating valve for high efficiency with the valve opening at only 1psi.
- All connecting threads are BSPT.
- New Zealand Made.
- Manufactured from strong, non-corrosive UV stabilised materials for a long life. These materials are approved for use with potable (drinkable) water.
OTHER AVAILABLE SIZE OF HEX SCREW CAP IN HCP
- HCV25 25mm (1″)
- HCV32 32mm (1 1/4”)
- HCP40 40mm (1 1/2”)
- HCP50 50mm (2″)
CHECK VALVE BROCHURE AND CHEAT SHEETS
- For HANSEN Check Valve Brochure and Cheat Sheets, refer to Hansen Australia Website.
HANDY TIPS AND COMMERCIAL VIDEOS
- For HANSEN Check Valve Handy Tips and Commercial Videos, refer to Hansen Australia Website.
CHECK VALVE STEPS TO QUICK AND EASY INSTALLATION (See full installation in image gallery or attached image)
- Use a thread sealant on all threaded connections. It is recommended to use Loctite 5331.
- Screw fitting into the check valve. Do not over tighten. Hand tight plus maximum of two turns with tools.
- All pipe work must be adequately supported.
- Check Valves should have a inline filter installed upstream of the check valve.
- This can be installed at any angle.
CHECK VALVE ASSEMBLY INSTRUCTIONS (See full installation in image gallery or attached image)
- These Instructions are for those situations where you need to clean out the valve in the event that grit or debris has reduced its working efficiency.
- NOTE: Before re-assembling make sure that all components are fully cleaned.
- Seat the diaphragm into the valve body.
- If spring is removed, place it over the pin and turn anti-clockwise whilst pushing firmly to retain it on the spigot.
- Place the cap onto the valve body.
- Screw the cap fully onto the valve body and tighten down, hand tight only. For the 63mm valve, use the lugs to tighten the cap a further 1/4 to 1/3 turn until it stops.
(The information given on this sheet is for guidance only. HANSEN PRODUCTS (NZ) LIMITED accepts no responsibility for the misuse or misapplication of this information.)
FREQUENTLY ASKED QUESTIONS
- QUESTION: I have an existing water line with a 40mm valve on it and I want to replace the valve with a Hansen Valve. Do I use the same size valve as my existing one?
- ANSWER: You will need to refer to the Check Valve Flow Chart being shown in the attached image gallery and use these chart to determine the valve size required. In some situations you may be able to use a smaller Hansen valve than your existing non Hansen valve.
- QUESTION: Can I use my Hansen fittings with my swimming pool/spa pool set up?
- ANSWER: No, as the high concentration of chlorine used in the water for pools will attack the material. The fitting material is only suitable for use with domestic water. Hansen products that are used in this application will not be covered by our Hansen Warranty.
- QUESTION: Can the Hansen Foot Valves be used with salt water passing through them?
- ANSWER: The spring in the valves is made of 302 grade stainless steel, and may eventually corrode in the salt water. The spring is available as a replacement part if required. All other parts of the valve are fully resistant to salt water.
- QUESTION: Do I have to remove my valve from the line to service?
- ANSWER: No. Your valve can be left inline for servicing. Please see Re-assembly instructions above.
- QUESTION: How do I know what size valve to use?
- ANSWER: Work out the flow of your pump (your pump installer/supplier can help you here) then refer to Choosing the correct Check Valve Chart above.
- QUESTION: I find my check valves too often not sealing, I’ve been told I should have a filter upstream of the valve, is this the same with the Hansen Check Valve?
- ANSWER: All check valves should be screened upstream. The advantage of the Hansen Check Valve is that they can be serviced in line if your water is dirty.
- QUESTION: I have noticed that the Hansen Check Valve has a screw top, does that mean it can be serviced inline?
- ANSWER: Yes, the Hansen Check Valve can be serviced inline and any parts replaced if required.
- QUESTION: The dam I’m pumping from can get quite dirty at times, including some slime and weed. I find my existing foot valve requires constant cleaning. Will the Hansen Foot Valve solve this problem?
- ANSWER: Yes, the Hansen Foot Valve has been designed with the ability to work in dirty water situations and because of lower head losses of this valve you can select a smaller size than you normally would expect, thus with the higher velocities across the diaphragm the valve becomes self-cleaning.
- QUESTION: The river I pump from is fairly shallow so I do pump some sand at times and find my existing Foot Valves have to be replaced often. Is the Hansen Foot Valve also a throw away valve?
- ANSWER: No, although pumping sand is unadvisable because of the damage to your pump. You will find with the screw cap service access to the Hansen Foot Valve you only need to replace the parts that wear in these circumstances. Another suggestion would be because the Hansen Foot Valve can be installed at any angle you may be able to install the Hansen Foot Valve vertically above your suction pipe and keep it above the sand.
- QUESTION: What temperature can I use Hansen Foot or Check Valve at?
- ANSWER: Hansen have tested all its products for use with cold water up to a maximum temperature of 60°C (140°F). It is not recommended to use these products with temperatures higher than 60°C (140°F) as plastic expands due to temperature increases. Hansen cannot guarantee the products will perform when used with temperatures over 60°C (140°F). Hansen products that have failed in temperatures higher than 60°C (140°F) will not be covered by Hansen Warranty.
- QUESTION: When choosing my Foot Valve do I select a valve size to match the suction pipe diameter?
- ANSWER: No. not necessarily, again because of the higher flow efficiencies of the Hansen Foot Valve you match your flow with the head loss your pump can afford, generally you will find the Hansen Foot Valve size will be less than the pipe diameter. To choose the correct sized valve for your application, refer or check the Check Valve Chart in the image gallery.
- QUESTION: Why won’t my valve seal?
- ANSWER: (1) There may be something sitting between the diaphragm and diaphragm seating area. Pull the valve apart and clean out (replace diaphragm if damaged) as per assembly instructions. (2) Check to ensure that you are using the correct size valve for your situation (check the Check Valve Chart in the image gallery).